So, you’re in charge of the trade show booth. It’s a task that sounds simple until you’re hit with a wall of confusing terms, dizzying options, and scary price tags. This guide will demystify the process of creating a trade show booth, turning ‘overwhelmed’ into ‘I’ve got this.’ The Amazing fact about trade show booth fabrication.
Your first and most important decision boils down to choosing one of three fundamental booth types. Getting this right sets the foundation for your budget, your look on the show floor, and your flexibility for future events. The main options are Portable, Modular, and Custom, and each serves a very different strategic purpose.
An easy way to understand the difference is to think about it like housing. A Portable booth is like a camping tent: it’s lightweight, sets up in minutes, and is extremely budget-friendly. A Modular booth is like a high-end prefab home, built from standardized parts that can be reconfigured for different shows. Finally, a custom trade show booth design is like an architect-designed house—built from scratch to be completely unique and make a major statement.
Deciding between modular vs custom exhibit displays or simple portable trade show booth solutions comes down to balancing your brand’s ambition with your budget and long-term event strategy. Are you prioritizing maximum impact for one critical show, or do you need a workhorse that looks professional and can adapt for years to come? Answering that question is the first step toward a successful exhibit.
Step 1: Creating the Blueprint for Your Booth
Once you’ve partnered with an exhibit design and construction company, the exciting part of the custom trade show booth design process begins. Before any materials are cut, your team will create a rendering—a detailed 3D computer image of your proposed booth. Think of it as the architect’s blueprint for your trade show home. It allows you to see exactly how the layout, lighting, and trade show graphics will look, preventing expensive surprises down the line and ensuring the final product matches your vision.
To bring this vision to life, your designer needs a few key ingredients from you. Providing these items upfront ensures the first draft is on the right track:
- Your logo and brand guidelines: Always send high-resolution vector files to avoid blurry graphics.
- Your key marketing message: What is the one thing you want an attendee to know?
- Examples of booths you like: Even a quick phone picture from another event is incredibly helpful.
When you review the rendering, don’t just ask if it looks good—ask if it works. Is the monitor at the right height for attendees to watch comfortably? Is there enough counter space for your product demo? Can people read your main message from across the aisle? This practical feedback is crucial. It helps transform a pretty picture into a functional, lead-generating machine for your team.
Step 2: From Digital Plan to Physical Structure – The Fabrication Phase
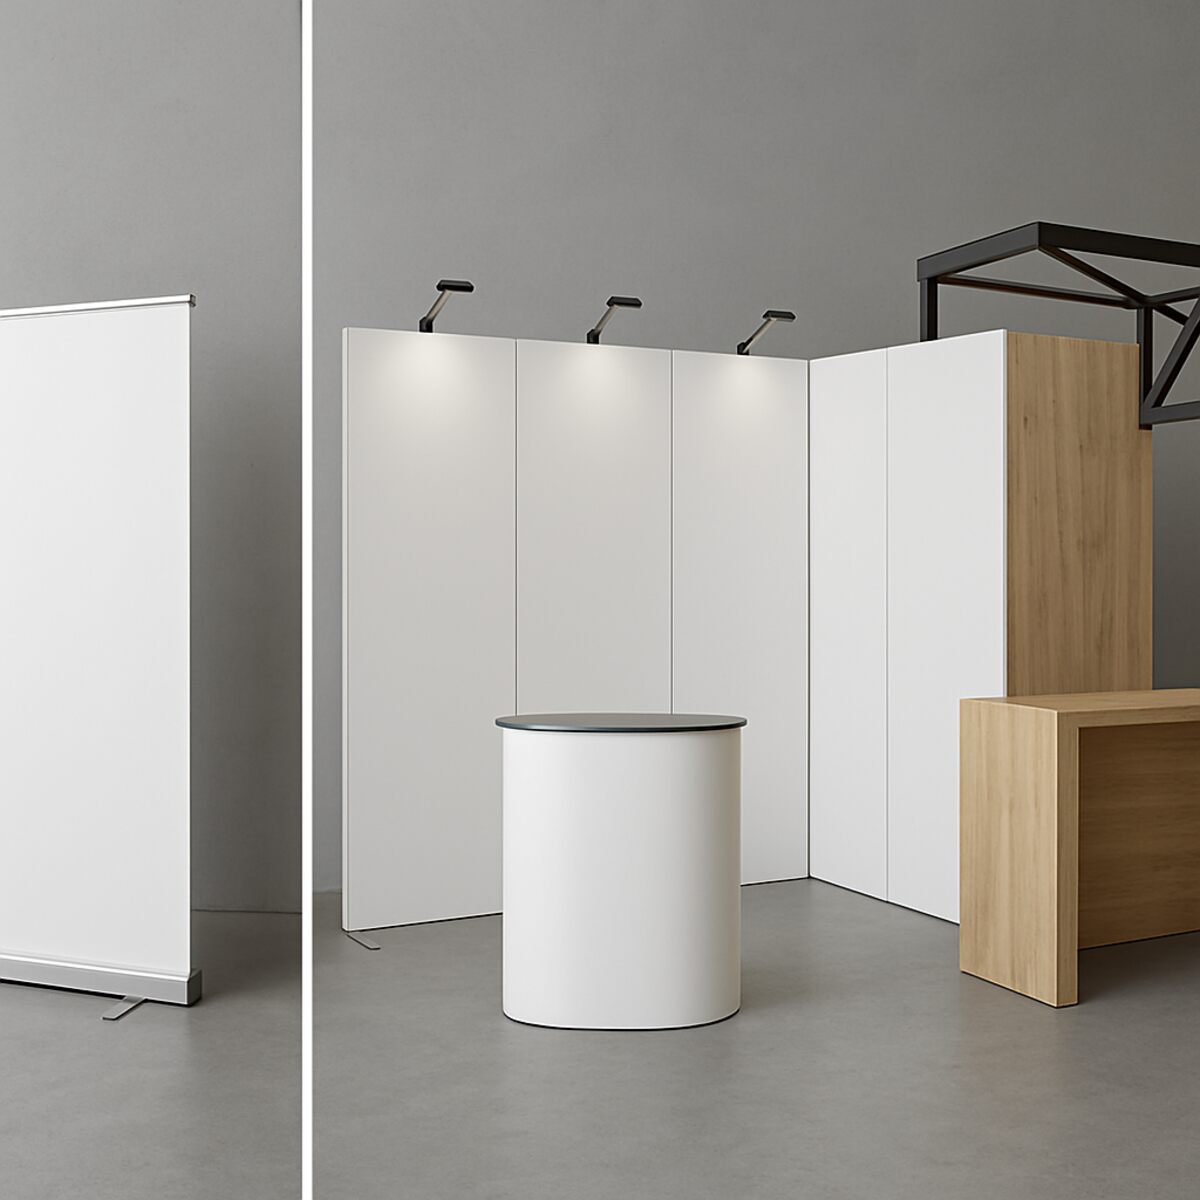
With your final design approved, your project moves from the screen into the workshop. This is the fabrication phase, where skilled builders translate that 3D rendering into a physical, three-dimensional structure. It’s the stage where blueprints become walls and digital concepts turn into tangible counters. During this process, one of the most important decisions is choosing the right trade show display materials, as they directly impact your booth’s look, budget, and logistical ease.
A huge part of modern exhibit construction revolves around tension fabric. Think of it as a high-quality, wrinkle-resistant shirt stretched perfectly over a lightweight aluminum frame. Graphics printed on fabric are incredibly vibrant and seamless, creating massive, eye-catching backdrops. The key advantage? It’s exceptionally lightweight, which significantly reduces shipping and handling costs—a major factor in your overall budget.
For elements that need more strength and a solid finish, builders often use laminate panels. These are rigid, durable surfaces, much like a modern kitchen countertop. Laminate is ideal for constructing sturdy reception desks, product shelving, or transaction counters where you need a clean, premium, and easy-to-wipe-down surface. While heavier than fabric, these panels provide a sense of permanence and are excellent for interactive or high-traffic areas of your booth.
Many of the most effective booths use a combination of both: brilliant tension fabric for the large, soaring graphics that draw people in, and sturdy laminate panels for the functional elements that serve your team and customers on the show floor.

Why Your Booth Graphics Are Non-Negotiable
All the beautiful materials and expert construction can be undermined by one simple mistake: low-quality graphics. A fuzzy logo or pixelated image stretched across a ten-foot wall instantly makes even the most expensive booth look amateurish. The quality of your digital files is a critical part of the custom trade show booth design process.
The problem often comes down to the type of file you use. If you try to enlarge a standard image file, like a JPEG, to the size of a wall, it becomes a blurry, pixelated mess. In contrast, professional designers use vector graphics. Instead of being made of pixels, these files are built using mathematical formulas, meaning your logo or design can be scaled up to any size—from a business card to a billboard—and remain perfectly sharp and crisp.
To avoid any printing disasters, you must provide your booth fabricator with the correct files. Simply ask your marketing department or graphic designer for the “vector files” of your logo and any brand graphics. These will typically be .ai (Adobe Illustrator) or .eps files. Providing these ensures that the final trade show graphics and printing will be flawless, protecting your investment and presenting your brand with the professionalism it deserves.
Step 3 & 4: Getting It There and Setting It Up
Your booth is fabricated, your graphics are printed, and everything looks perfect in the workshop. But the job isn’t done. Getting these precisely engineered parts to the trade show floor—and then putting them all together—involves two final, critical steps: shipping and setup.
Here you’ll encounter the term I&D, which stands for Installation and Dismantle. This is the expert assembly service for your booth. A specialized crew handles the entire process: they receive your booth when it arrives at the convention center, unbox all the components, build your display exactly to the design plan, and manage the wiring. After the show, they do it all in reverse, carefully dismantling and repacking everything. In many large venues, using the official I&D service is mandatory.
Crucially, shipping and I&D are almost always budgeted as separate line items from the booth fabrication itself, so be sure to account for them to avoid surprises. Understanding these logistical costs ensures your beautiful new booth is set up flawlessly and without last-minute stress. Once your structure is standing tall, you can focus on making the space a magnet for attendees.
How to Make Your Booth Interactive on a Small Budget
Once your booth is standing, the real work begins: getting attendees to stop walking and start talking. A great design helps, but the most effective booths invite participation. Instead of a passive TV loop, use simple interactive elements to turn your space from a billboard into a destination—and it doesn’t have to be expensive.
Figuring out your interactive exhibit design ideas can feel daunting, but a few high-impact additions can make all the difference. Here are three proven, low-cost options that get people to step inside your booth:
- A Charging Oasis: Offer a comfortable chair and a multi-device charging station. A low battery is a universal problem on the show floor. By solving it, you get a captive audience for a few minutes—a perfect, low-pressure opportunity to chat.
- A “Spin-to-Win” Game: A simple prize wheel creates buzz. Prizes can be small—like branded pens or a discount code—because the game itself is the icebreaker.
- A Hands-On Station: Instead of just talking about your product, let people touch it. Set up a simple table where attendees can interact with a physical product or try a simplified demo on a tablet.
The principle is simple: offer value before you ask for an attendee’s time. A charged phone, a fun game, or a hands-on demo is the perfect icebreaker. This shift from a passive display to an active engagement hub can dramatically increase your conversations and leads.
What Does a Custom Exhibit Actually Cost?
It’s the question that keeps every first-time exhibitor up at night: how much does a custom exhibit cost? The honest answer is that it varies widely, but you can establish a strong baseline. The final price tag depends on the complexity of your design, the materials used, and the technology you integrate. It’s a classic case of “you get what you pay for.”
The price of the physical booth itself generally falls into predictable tiers. A simple portable 10-foot display might cost between $2,000 and $7,000. A modular setup for the same space often ranges from $10,000 to $25,000, offering more presence and reusability. A fully custom booth, built from scratch, typically starts at $25,000 and can easily climb into six figures for larger, more elaborate designs.
However, the cost of the booth is only about one-third of your total event expense. To avoid surprise costs, use the “3x Rule.” For every dollar you spend on your physical booth, expect to spend another dollar on show services (like floor space, electricity, and drayage) and a third dollar on indirect costs (like staff travel, hotels, and pre-show marketing).
Applying the “3x Rule” transforms your budget from a guess into a strategic plan. If you have a total event budget of $60,000, you can confidently allocate around $20,000 to one of the trusted exhibit design and construction companies to build your booth. With a handle on your budget, the next critical piece of the puzzle is time.
The Ultimate Trade Show Timeline: How to Avoid Last-Minute Panic
With your budget taking shape, the next question is always, “When do we need to start?” The single biggest source of stress—and surprise costs—for first-time exhibitors is underestimating the timeline. A well-planned custom trade show booth design process isn’t just a suggestion; it’s your best defense against last-minute panic and avoidable rush fees. A great booth simply cannot be rushed.
While every project is unique, most successful builds follow a clear set of milestones. To keep your project on track, work backward from your event date with this simple roadmap:
- 6+ Months Out: Finalize Budget & Partner. This is when you research and select the fabrication company that fits your vision. Having a partner locked in this early gives you time for thoughtful collaboration instead of hurried decisions.
- 4 Months Out: Lock In Your Design. After exploring concepts, you’ll approve the final 3D rendering. Your partner then begins the technical work, including the necessary exhibit booth structural engineering, to turn the blueprint into a reality.
- 2 Months Out: Finalize Graphics & Logistics. This is your deadline for approving all printed materials and confirming shipping arrangements, along with your plan for installation and dismantle (I&D) on the show floor.
Following a timeline like this does more than just ensure your booth arrives on schedule. It protects your budget from expensive expedited charges and, most importantly, gives your team the mental space to plan for what truly matters: creating an experience that gets your booth noticed.
Your Action Plan for a Booth That Gets Noticed
A great exhibit isn’t magic; it’s the result of smart decisions made in the right order. By understanding the core choices around booth type, design, materials, and logistics, you are prepared to have an intelligent conversation about your company’s goals and move forward with confidence.
To turn this knowledge into results, follow this simple four-step action plan to get started today.
Your 4-Step Action Plan:
- Settle on your budget and primary goal (leads, brand awareness?).
- Decide which booth type (Portable, Modular, Custom) fits your needs.
- Gather your brand assets (logos, colors).
- Start researching exhibit design and construction companies that align with your vision.
The world of trade show booth fabrication is no longer an intimidating barrier, but a straightforward path to creating a presence that makes your team proud. You have the framework to begin and are ready for that first step.