Welcome to the colorful world of henna! If you’re looking to dive into the art of henna, also known as mehndi, you’ve come to the right place. Whether you’re a complete newbie or just looking for some simple designs to try out, this guide will walk you through easy henna mehndi designs that you can master in no time. So, grab your henna cone, and let’s get started! Find the best henna tattoo mehndi design simple.
Henna mehndi is a form of body art that uses a paste made from the powdered leaves of the henna plant. It’s been around for centuries and is used in various cultures for special occasions like weddings and festivals. Henna is all about creativity and expression, and the best part? It’s temporary, so you can experiment as much as you like!
Henna has been used across many cultures, including Indian, Middle Eastern, and African traditions, for thousands of years. Each culture has its unique style and symbolism attached to henna designs. For example, in Indian weddings, henna is used to bless the bride with prosperity and joy, while in the Middle East, henna is often applied during festive celebrations like Eid.
While henna is widely recognized, the designs and application methods differ significantly across regions. Indian designs are often intricate and cover large areas of the body, like the arms and feet, while Arabic designs are more flowing with large, bold elements. African henna, on the other hand, often incorporates geometric shapes and symbols.
Today, henna is not just limited to traditional ceremonies. It has gained popularity in the Western world as a form of temporary body art and self-expression. Many people choose henna for its natural, non-permanent qualities, allowing them to adorn their skin for special occasions or simply for fun without the commitment of a tattoo.
Before you begin, let’s gather some basic tools:
- Henna Cone: This is your primary tool. Think of it as your pen for drawing.
- Paper Towels: For any spills or mistakes. Trust us, they happen!
- Lemon-Sugar Mix: Helps to darken the henna stain.
- Cotton Swabs: Perfect for correcting any slip-ups.
When selecting a henna cone, ensure it is fresh for the best color results. A fresh cone will feel cool to the touch and have a deep, rich color. Avoid cones that have been sitting for too long, as they may produce a lighter stain. You can also make your henna paste for an even fresher application.
Apart from the basic tools, some artists prefer to use toothpicks or thin brushes for detailing. These tools can help in creating intricate designs or correcting any minor errors. Having a small bowl of water nearby can also be useful for cleaning tools or diluting henna if needed.
Set up a clean, well-lit workspace before starting your henna application. Lay out all your tools within easy reach and ensure you have a comfortable chair or surface to work on. Good lighting is crucial for seeing fine details, especially if you’re working on intricate patterns.
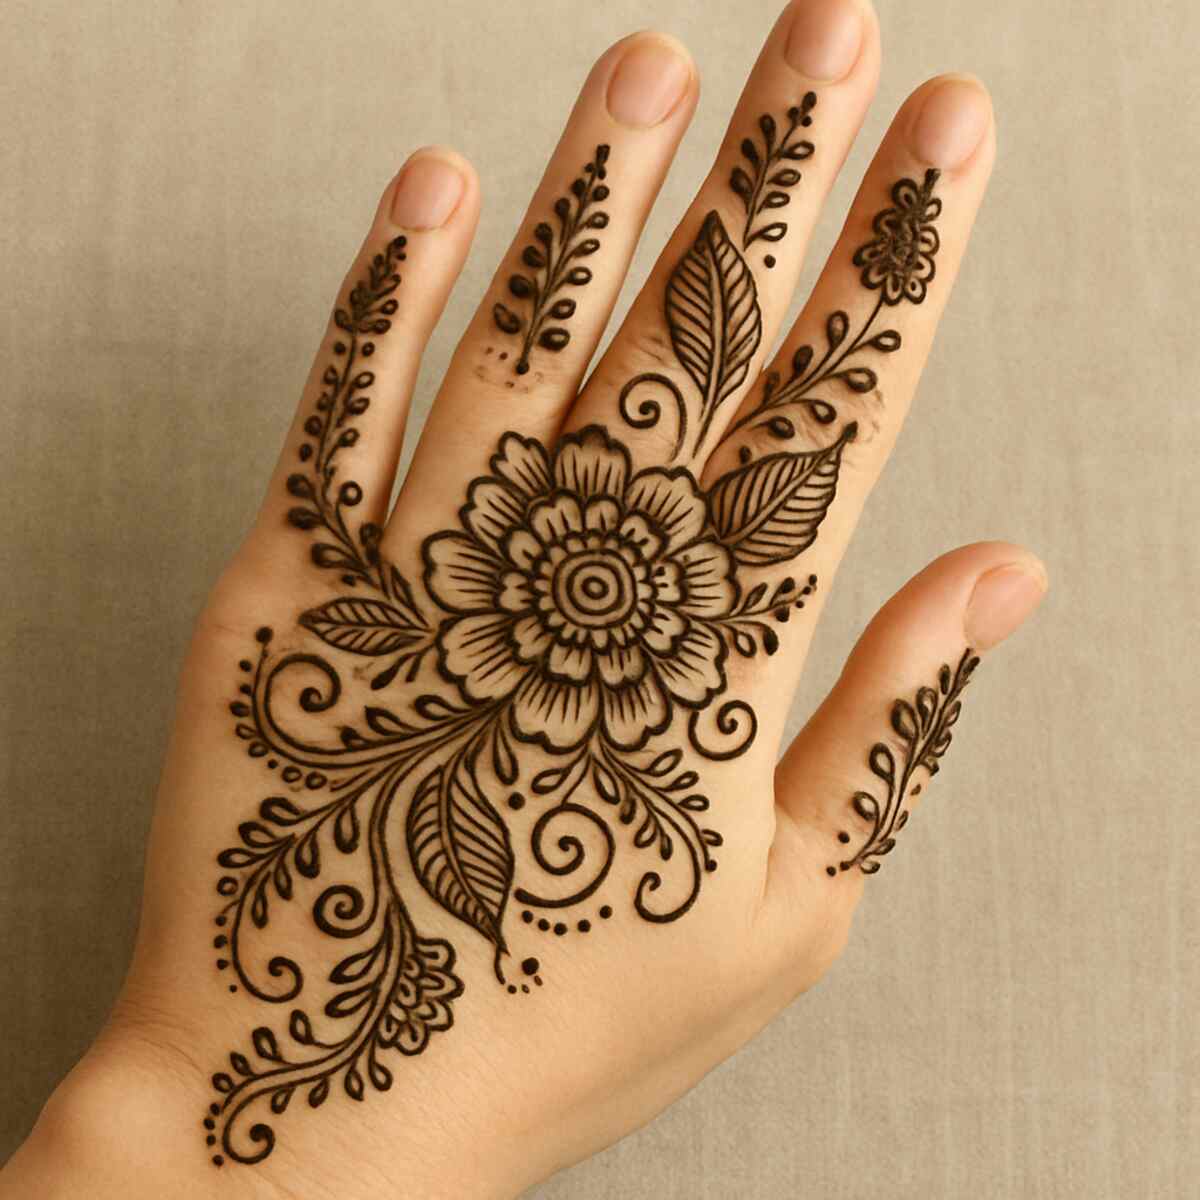
Let’s explore some easy henna designs that are perfect for beginners. Remember, practice makes perfect, so don’t worry if your first few attempts aren’t Instagram-ready!
Start with something simple, like dots and small flowers. Dots are the bread and butter of henna designs; they add detail and are super easy to do. Try creating a small flower on the back of your hand and surround it with dots.
Steps to Mastering Dots and Flowers
- Begin with a small circle in the center of your design. Keep the initial circle light as a guide; you can darken it later.
- Draw petals around the circle. Keep them small and close together . Experiment with different petal shapes, like rounded or pointed.
- Add dots around the flower to fill in the spaces. Dots can vary in size for a more dynamic look.
Variations to Experiment With
Once you feel comfortable, try incorporating leaves or vines extending from the flower. This adds complexity to the design without overwhelming the beginner artist. You can also try layering flowers of different sizes to create a bouquet effect. Tips on mehndi designs.
Tips for a Smooth Finish
To achieve a smooth finish, maintain a steady hand and consistent pressure on the henna cone. This will ensure even lines and prevent smudging. Remember, practice on paper first if you need to build confidence.
The Elegant Paisley Pattern
The paisley pattern is a timeless design that looks intricate but is surprisingly easy to create.
Steps to Create a Paisley Pattern
- Start with a small paisley shape—think of it as a teardrop with a twist. Ensure the base of the teardrop is wide enough to add details later.
- Add a few more paisley shapes around it, varying the sizes. Overlap them slightly for an interwoven effect.
- Fill in with simple lines and dots to add detail. You can also add small flowers or leaves inside the paisleys.
Exploring Different Paisley Designs
Experiment with different paisley orientations, such as cascading down the arm or arranged in a circular pattern. You can also incorporate shading within the paisleys by varying the pressure on the cone to create depth.
Common Mistakes and How to Avoid Them
One common mistake is making the paisley too large, which can make it challenging to add details. Keep your initial shapes small and expand as needed. If you make an error, use a cotton swab to gently remove the mistake and start again.
The Simple Mandala

Mandalas are not only beautiful but also a great way to practice symmetry and balance.
Steps to Crafting a Mandala
- Begin with a small circle in the center of your palm. This will be the anchor point for your design.
- Create larger circles around it, adding petals or other shapes as you go. Use a light hand for the initial outline, then darken it as you add details.
- Use dots and lines to add detail and fill empty spaces. Symmetry is key, so take your time to ensure balance.
Variations and Creative Ideas
Mandalas can be adapted by changing the shapes within each layer. Try incorporating triangles, squares, or even spirals for a unique touch. You can also experiment with asymmetrical mandalas for a modern twist.
Techniques for Precision
To maintain precision, work from the center outward, ensuring each layer is complete before moving to the next. Use your non-dominant hand to steady the hand applying the henna, minimizing shakes and ensuring cleaner lines.
Tips for Perfecting Your Henna Art
- Practice on Paper: Before you commit to your skin, practice your designs on paper. This helps build confidence and muscle memory.
- Steady Your Hand: If your hand shakes, try resting it on a table while applying henna.
- Control the Flow: Squeeze the cone gently to control the flow of henna. Too much pressure can lead to thicker lines than intended.
- Be Patient: Henna needs time to set. Leave it on for at least 2-4 hours for a deeper color.
Building Muscle Memory
Regular practice on paper helps develop the muscle memory necessary for consistent designs. Start with basic shapes and gradually move to more complex patterns. This practice will translate into more confident applications on the skin.
Techniques for a Steady Hand
If you struggle with a steady hand, try using a wrist rest or positioning your elbow on a stable surface. Breathing evenly and taking breaks can also help maintain steadiness. Practicing mindfulness techniques can reduce anxiety, leading to a calmer application process.
Managing Henna Flow
Controlling the henna flow is crucial for clean designs. Practice applying different levels of pressure to understand how it affects line thickness. If the henna cone is too full or stiff, massage it gently to ensure an even flow.
Patience and Timing
Allowing henna to fully set is essential for achieving a rich color. Avoid rushing the process by planning your application time wisely. Use this waiting period to relax or work on other creative projects.
Aftercare for Long-Lasting Color
To ensure your henna design lasts and looks vibrant, follow these aftercare tips:
- Lemon-Sugar Sealant: Once the henna starts to dry, dab a lemon-sugar mix onto it. This helps keep the paste moist and improves the stain.
- Avoid Water: Keep the henna dry for as long as possible. Water can lighten the stain.
- Let it Flake: Don’t wash the dried paste off. Let it flake off naturally to ensure the darkest stain.
Using Natural Enhancers
For a deeper stain, consider using natural enhancers such as eucalyptus oil or clove oil. Apply these oils to the design after the paste has been removed to deepen the color and add a pleasant scent.
Timing Your Aftercare
Timing is crucial in the aftercare process. Apply the lemon-sugar mixture when the henna is semi-dry and let it remain undisturbed for several hours. The longer you leave it on, the darker the stain will be.
Long-Term Care Tips
To maintain the vibrancy of the henna stain, avoid exfoliating the area and apply a natural moisturizer, like coconut oil, daily. This helps in prolonging the life of the design and keeps the skin hydrated and healthy.
Experiment and Have Fun!
Henna is all about expressing yourself, so don’t be afraid to experiment with different designs and techniques. The more you practice, the more confident you’ll become. And remember, every mistake is just a stepping stone to mastery. Happy henna designing!
Embracing Creativity
Don’t hesitate to let your creativity shine through in your designs. Try mixing different styles or incorporating elements from nature, like leaves or animals, to personalize your henna art. The possibilities are endless, and every design is a reflection of your unique style.
Learning from Mistakes
Mistakes are a natural part of the learning process. Instead of getting discouraged, use them as opportunities to learn and improve. Over time, you’ll develop your style and techniques, leading to more intricate and beautiful designs.
Joining the Henna Community
Consider connecting with other henna enthusiasts to share tips, designs, and feedback. Social media platforms and henna workshops can provide valuable insights and inspiration. Engaging with a community can also be a source of motivation and encouragement as you hone your skills.